Showing posts with label Nut-Free. Show all posts

Wednesday, May 25, 2016

WRAP WEDNESDAY!: Vegan "Honey" Mustard Tofu Lettuce Wraps with Black Bean Spaghetti.

Happy Hump Day y'all! :)
I don't know about you, but Wednesdays are usually pretty busy for me. Between work, classes, homework, and extracurriculars, I'm worn out by the time I get home in the evening! That said, a girl's still gotta eat dinner...no matter HOW hectic the day's been! That's the best part about these Vegan "Honey" Mustard Tofu Lettuce Wraps with Black Bean Spaghetti...they're delicious, healthy, well-rounded and filling (packing a whopping 45 GRAMS of plant-based protein!)...and ready in a little over 10 minutes. SAY WHA?!?!?!? For real. Even better?! They both look AND taste good enough (and complicated enough!) to serve to your friends for a quick dinner party option.
Without further ado, enjoy, guys!

Vegan "Honey" Mustard Tofu Lettuce Wraps with Black Bean Spaghetti.

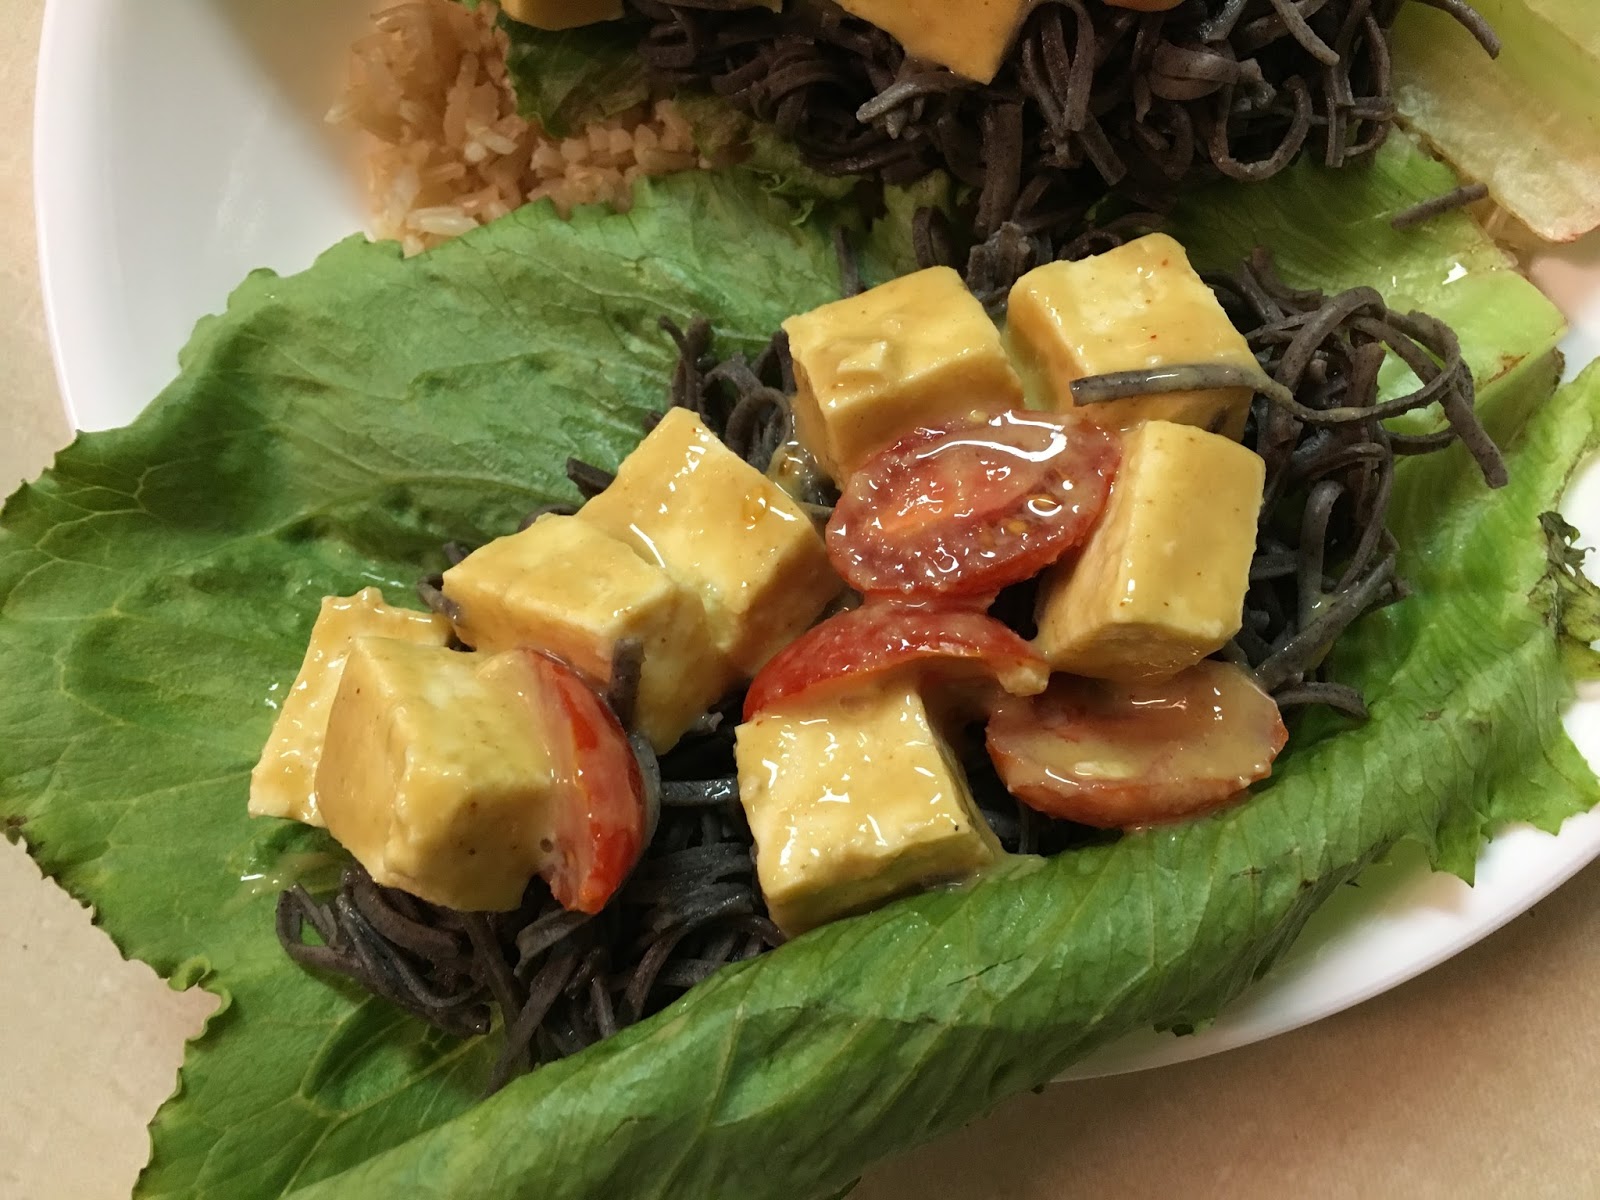
Juicy, sweet, and tangy!

Healthy and delicious!

Vegan "Honey" Mustard Tofu Lettuce Wraps with Black Bean Spaghetti. Vegan, Gluten-free. Serves one.


Ingredients
1. 3 oz. water-packed extra-firm tofu, cubed
2. 1/3 cup sliced cherry tomatoes
3. 1 T dijon mustard
4. 1 T vegan "honey" substitute (see below for my fave brands!)
5. 1/8 tsp each onion and garlic powders
6. Cayenne pepper, to taste
7. 1/2 tsp soy sauce (or Bragg's liquid aminos)
8. 2 oz. dry black bean spaghetti noodles (purchase them below!)
9. 2 Romaine lettuce leaves
10. Precooked brown rice

Method
1. Fill a small soup pot 3/4 full with water and bring to a boil. Add spaghetti noodles and let simmer 10 minutes. Drain water and set aside to cool.
2. Combine dijon mustard, "honey," spices, and soy sauce in a small/medium-sized bowl and whisk well. Add tofu cubes and toss to coat. Add sliced tomatoes and toss.
3. Fill lettuce leaves with black bean spaghetti and top with "honey" mustard tofu mixture. Serve over brown rice.


Sunday, March 27, 2016

Holiday Post!: Resurrection Cookies (HIGH PROTEIN!).

When I was growing up, my mom would always make "resurrection cookies" every Easter. Not only were they delicious, but I have so many happy memories surrounding the whole process of making these. I remember it just like it was yesterday: standing in the kitchen with my mom and sister, with all 6 of our hands shaping these little cookies...and then eating them while watching movies!
So what exactly ARE resurrection cookies, you may be wondering? Besides the MOST DELICIOUS THING IN THE WORLD, of course...so easy you almost can't call it a recipe. When I used to make them as a kid, they were simply pre-made crescent roll dough with a marshmallow wrapped inside. When you bake them, THE MARSHMALLOW "DISAPPEARS!" Or at least, that's what it seems like to a 6 year old ;) The idea behind these cookies is that you're "placing Jesus in the tomb." And when you open the tomb (i.e. "bite the cookie" haha) HE IS NO LONGER THERE! I've always thought it was creative (and of course delicious!). And with my recipe, they're HEALTHY, too! Happy Easter guys! Go make some resurrection cookies :)


Resurrection Cookies!

So good.

Protein Resurrection Cookies. Vegan, Gluten Free. Makes three large cookies.

Ingredients
1. 1/2 cup flour of choice
2. One scoop vanilla vegan protein powder
3. 1/2 tsp vanilla extract
4. 1/2 tsp baking powder
5. One packet stevia powder
6. 4 T water
7. 3 vegan marshmallows (like Dandie's brand)

Method
1. Preheat oven to 350 F and line a baking sheet with parchment.
2. In a medium-sized bowl, mix flour, protein powder, stevia, and baking powder. Add water and mix to form a dough.
3. Divide dough into 6 sections. Take one section in hands, roll into a ball, and flatten into a circle. Place on parchment and repeat with remaining 5 sections.
4. Place one marshmallow in the center of one circle of dough. Top with another dough circle and gently press outer edges together to seal. Repeat for 3 large cookies.
5. Cover cookies with a foil tent and bake for 25-30 minutes, until firm and set.
6. Remove from oven and let cool 10 minutes before enjoying.

Saturday, March 19, 2016

BBQ Lentils and 'Shrooms.

If you're anything like me, BBQ anything is good...but when it's hearty brown lentils and meaty mushrooms that are dredged in a sweet and tangy spicy BBQ sauce?! Well, "good" just turned into "glorious"!
This is a super quick protein dish that is perfect to throw on top of a toasted hamburger bun, rice cakes, mixed greens, steamed veggies, or even brown rice or quinoa. Takes about 5 minutes, start to finish (no joke!), and tastes as if you slaved in the kitchen for hours. Sounds to me like I just decided what you're having for lunch tomorrow (or midnight snack tonight, maybe?!). Enjoy, everyone!


BBQ Lentils and 'Shrooms.


BBQ Lentils and 'Shrooms. Vegan, Gluten-free. Serves one.

Ingredients
1. 1/2 cup canned lentils, drained and rinsed
2. 1/2 cup sliced mushrooms
3. 3 T BBQ sauce of choice (try my Spicy Chipotle BBQ recipe, on the blog!)

Method
1. Combine all ingredients in a small soup pot over medium-high heat and bring to a simmer. Cook, stirring constantly, until heated through and bubbling slightly. Serve as desired! 

Sunday, February 21, 2016

My Favorite Weeknight Dinner: Savory Oatmeal!

If you're one of those people who think oatmeal is strictly a breakfast food, prepare to have your world rocked....in a GOOD WAY! Savory oatmeal is the new thing, people. Seriously. If you've never tried it before, this is a great recipe to start with--quick and simple and loaded with flavor and nutrition. Add a simple side salad and some fresh fruit and BOOM--"Dinn in 10"! Enjoy, guys!

Roasted Garlic  Savory Oatmeal.

Roasted Garlic Savory Oatmeal. Vegan, Gluten-Free. Serves one.

Ingredients
1. 1/2 cup old-fashioned oatmeal
2. 1 cup unsweetened cashew milk
3. 1/4 tsp garlic powder
4. Onion powder, salt, and black pepper, to taste
5. Toppings of choice (I used a tossed medley of grape tomatoes, lentils, corn, green peas, and chopped carrots, with a drizzle of dijon mustard...delicious!)

Method
1. Place milk in a small soup pot and bring to a boil over high heat. Reduce heat to medium and whisk in oats and spices OFF OF HEAT.
2. Return pot to heat and whisk well. Cook, stirring regularly, until thickened.
3. Pour into bowl and let sit 5 minutes. Top as desired and serve!

Wednesday, February 3, 2016

Protein Pasta Salad!

What's up with the weather this year? It's crazy! Last week we had 2 feet of snow on the ground...and today it was 59 degrees. But this girl ain't complaining--I HATE winter! Anyway, this warm burst has got me craving Spring...and springtime FOODS! And one of my all-time FAVORITE spring and summer dishes? PASTA SALAD. MMMMMMMMHHHMMMMM. And my Protein Pasta Salad is even better than regular pasta salad (shocking, I know)...because it has an impressive 25 GRAMS OF PLANT PROTEIN PER SERVING/RECIPE! My secret? BEAN PASTA NOODLES. I used a lentil macaroni noodle from the brand "Pasta Legume" which I am OBSESSED with, but I love all the bean pasta brands out there! Explore Asian is another great brand...love their mung bean fettuccine! I know. I just turned pasta salad fit. You love me, I know. Enjoy :)


Protein Pasta Salad!


Protein Pasta Salad! Vegan, Gluten-free. Serves One.


Ingredients
1. 3/4 cup bean-based small pasta noodles (I used lentil macaroni noodles from "Pasta Legume")
2. 1/4 cup chopped red onion
3. 1 cup raw cauliflower florets
4. 1/2 cup sliced grape tomatoes
5. 1/2 cup canned pinto beans, drained and rinsed
6. one stick celery, sliced
7. 1/8 tsp each onion and garlic powder
8. 2 T white vinegar
9. black pepper and dried parsley, to taste
10. salt, to taste

Method
1. Bring a small soup pot of water to a boil on the stove. Add pasta noodles and cook until al dente--NOTE--bean-based pastas cook MUCH faster than grain-based. When the pot begins to overflow, the goods are done!
2. Drain noodles and rinse briefly under cold water.
3. Combine noodles with remaining ingredients and toss well.
4. Spoon pasta salad into a large bowl, cover, and refrigerate 30 minutes for flavors to mingle (or until ready to eat). Serve chilled and enjoy!

Tuesday, February 2, 2016

Roasted Tofu Tacos with Sliced Beets and Pumpkin-Herb Sauce.

Happy Taco Tuesday, my lovers! Taco Tuesday dinners are always one of my favorites of the week...as if traditional Mexican tacos (or Tex-Mex...) aren't amazing enough, when you start branching out with what to fill in your tortillas, well, let's just say the possibilities are endless!
These Roasted Tofu Tacos with Sliced Beets and Pumpkin-Herb Sauce are so yummy, and super quick to prepare! Less than 8 ingredients, minimal prep time, and only about 20 minutes cooking time. BOOM! #TacoTuesYAY.

Roasted Tofu Tacos with Sliced Beets and Pumpkin-Herb Sauce.


Roasted Tofu Tacos with Sliced Beets and Pumpkin-Herb Sauce. Vegan, Gluten-free. Serves one.


Ingredients
1. Two soft corn tortillas
2. Two handfuls fresh spinach leaves, steamed
3. 5 oz. extra-firm tofu
4. pinch of salt
5. onion and garlic powders, black pepper to taste
6. 1/2 cup sliced, steamed red beets
7. 2 T canned pumpkin puree
8. splash of barge's liquid aminos (or soy sauce)
9. dried herbs and spices of choice, to taste


Method
1. Preheat oven to 400 degrees Fahrenheit and line a baking sheet with parchment paper.
2. Chop tofu cubes into small chunks and place in a medium-sized bowl, along with salt, onion, garlic, and black pepper. Toss with spoon to coat.
3. Spread tofu over parchment and roast for 20-30 minutes, until crispy. Remove from oven and let cool.
4. While tofu is baking, begin plating your tacos. Place tortillas on a large plate and divide steamed spinach between the two.
5. In a small bowl, whisk pumpkin puree with enough water to form a sauce. Add herbs and spices of choice, along with aminos/soy sauce, and stir well.
6. Top spinach with tofu, then steamed beets, and finally, pumpkin sauce. Serve!

Saturday, January 23, 2016

Snowstorm Stew!

So, if you haven't noticed, it's snowing outside. ;)
I have to admit--this is probably the most snow I've ever seen in my life...and the "stormiest" snow episode I've ever lived through! Being from Central Virginia originally, I didn't grow up used to seeing "snowmaggedons" every winter...the most snow I ever remember getting as a child was 10 inches! But this?! This is actually frightening. Yes, you read that correctly. I am actually scared as I sit here and type this while I simultaneously watch the snow blowing wildly outside. *sigh*
Anywho, this is a really quick and yummy stew that's PERFECT for a snowy day like today--warming from the inside out and chock full of nutrient-rich veggies, this stew is certain to make it on your "fave recipes" list. Enjoy! And stay warm :)


Snowstorm Stew!


Snowstorm Stew! Vegan, Gluten-free. Serves one.

Ingredients
1. 1 cup canned pumpkin puree
2. 1 cup no-salt-added vegetable broth
3. one small zucchini, chopped
4. one small carrot, peeled and chopped (or 6 baby carrots)
5. 1 cup frozen florets
6. 1/2 cup canned, no-salt-added diced tomatoes
7. 1/3 cup frozen corn
8. 1/2 cup canned chickpeas, drained and rinsed
9. herbs and spices of choice
10. salt, to taste


Method
1. Combine all ingredients in a medium-sized soup pot and stir well. 
2. Bring to a boil over medium-high heat and boil for 5 minutes.
3. Reduce heat to medium and simmer, stirring regularly, for 10-15 minutes for flavors to mingle.
4. Scoop into a LARGE bowl (this makes A LOT!) and serve. (I topped mine with ground golden flaxseed for texture--delish!)


Tuesday, January 19, 2016

Flax 'n Protein Power Balls!

If you have followed me or my recipes for any length of time at all, you already know that I'm pretty much OBSESSED with flaxseed. I'm also pretty obsessed with protein powders...and the only thing better than these two things enjoyed separately, is these two things COMBINED! All you need is rice protein, ground flaxseed, stevia, water, and 5 minutes prep time (and a few hours in the fridge)...then BAM! Just like that, new fave recipe. That was easy.


Flan 'n Protein Power Balls!
"I'm so cute."


Flax 'n Protein Power Balls!
Vegan, Gluten-free. Serves one.


Ingredients
1. 1/4 cup rice protein (brown rice or regular)
2. 2 T ground flaxseed
3. one packet stevia powder
4. 3-4 T water


Method
1. In a medium-sized bowl, mix protein powder, flax, and stevia.
2. Add water 1 T at a time until you get a workable consistency--don't add so much as to make them gummy...you just want them pliable.
3. Divide dough into 6 small sections and roll into balls.
4. Place power balls on a small plate, cover, and refrigerate for 1 hour or more, to firm up a bit.
5. Remove from fridge and enjoy!

Saturday, October 25, 2014

College Food: Quick Spicy Italian Wrap.

So college. Let's just say...I AM LOVING IT! Learning so much and literally soaking up everything like a sponge. For those of you suffering through high school, KEEP PERSEVERING--it gets sooooo much better! 
So I'm loving it so much, but I am SO BUSY. Oh my gosh. Literally running from one thing to the next (and I really do mean literally!). So eating has become rushed and thrown together most of the time. But I've discovered from my "throw together" meals, that those little rushed food combos actually turn out to be THE BEST RECIPE CREATION! Funny how things work...


              Quick Spicy Italian Wrap. 


   Behind the scenes: filling goodness!


Quick Spicy Italian Wrap; Vegan, Gluten-free. Serves one hungry college kid. 


Ingredients 
1. One extra large tortilla or lavash wrap
2. 1/3 cup tvp granules
3. 1/2 tsp Italian seasoning
4. Pinch of chipotle powder
5. 2 tsp bragg's liquid aminos
6. Scant 1/3 cup water
7. 1 cup raw spinach leaves
8. 1/2 cup oil free marinara sauce (I'm loving Engine 2 brand!)
9. Black pepper to taste


Method
1. Lay out your wrap on a large plate. Too with a hearty layer of spinah leaves. 
2. In a medium size bowl, mix TVP, spices, water, and aminos. Nuke 1 minute. When done cooking, mix in marinara and nuke another 40 seconds or until warm. Spread over spinach, too with pepp, and wrap it up, 'yo! Delish and college-friendly ❤️

Holiday Post!: "Witch Fingers".

Halloween. This one little word sparks such excitement in me. ✨ Halloween is without a doubt my ALL TIME FAVORITE HOLIDAY! The sights, the smells, the weather...I'm pretty certain one of the main reasons it's my favorite is pumpkin...buuuuuut that's for another post 😂
These "Witch Fingers" are a super fun and healthy halloween themed snack you can bring to a party or simply enjoy on your own! Sooooo quick to make and surprisingly yummmmmm. Happy halloween! 🎃👻


                    "Witch Fingers". 


            How cute are these guys?! 


Witch Fingers; Vegan, gluten-free. Serves one (can easily be doubled or tripled!). 


Ingredients 
1. 6 baby carrots
2. 6 raisins


Method
1. If your carrots are a little wet, dry them off well with a paper towel. Otherwise the raisins won't stick!
2. Take your raisins and peel off one side of the skin. Stick the raisin on the end of one of your carrots, sticky side down. Press down to secure the "fingernail". 
3. Repeat for all "fingers". Refrigerate until ready to serve. 


Saturday, September 20, 2014

French Fry Oatmeal (no I'm not kidding...!)


Ok...before you read the title of this post and go "THAT IS DISGUSTING!" hear me out. You like french fries (I'm assuming...I mean, WHO DOESN'T?!). You like oatmeal (now this one's a given). Why not combine the two?! And BOY DID I...! Behold, my friends: my new favorite lunch.


French Fry Oatmeal.

YUM ALERT!


French Fry Oatmeal; Vegan, Gluten-free. Serves One.


Ingredients
  1. 1/2 cup oats of choice (I used oat bran)
  2. 1/4 tsp EACH onion powder and garlic powder
  3. black pepper to taste
  4. 1 teaspoon bragg's liquid aminos
  5. 1 cup water


Method

  1. In a medium-sized microwave-safe bowl, mix oats and all spices (including pepper). 
  2. Add water and aminos and let sit for about 10 minutes, until most of water is absorbed.
  3. Microwave on HIGH power for two minutes, watching carefully to make sure it doesn't overflow!
  4. Remove from microwave and top with unsweetened ketchup. DEVOUR! 


Monday, May 5, 2014

Holiday Post!: Lemon-Lime "Zinger" Smoothie.

Cinco de Mayo is a holiday worthy of celebration, right?! In my opinion, any holiday that involves themed-food is worthy of celebrating. You all know I absolutely LOVE making holiday food and creating fun holiday-themed recipes. I'm so corny like that...!
This Lemon-Lime "Zinger" Smoothie is perfect for Cinco de Mayo. Cool and tangy, a perfect treat to sip on as you're sitting poolside this summer too.


Lemon-Lime "Zinger" Smoothie.


Lemon-Lime "Zinger" Smoothie; Vegan, Gluten-Free. Serves One. 


Ingredients
  1. one whole lemon, peeled, sectioned, and frozen
  2. one whole lime, peeled, sectioned, and frozen
  3. 1 cup water
  4. 1-2 stevia packets (I know it seems like a lot, but TRUST me...)

Method
  1. Combine all ingredients in a Vitamix or other high speed blender and blend until frosty. Enjoy!


Frosty Deliciousness. Yummmmmmo.


Monday, April 7, 2014

Holiday Post!: Carrot Cake Pancakes.

You knew it was coming. What food blogger can't post SOME SORT of carrot cake recipe when Easter rolls around? Not this one, that's for sure...
This is not your traditional carrot cake. But that makes this recipe even better! I always say the stranger, the better!
These little guys are about the closest you can get to actually eating cake for breakfast. The coconut flour is the secret ingredient in this recipe. Coconut flour is amazing. I absolutely LOVE cooking with it. It gives such an amazing texture to typically grain-based recipes. It really gives these pancakes their "cakiness". Combine yummy coconut with carrots, sweet and plump raisins, and yummy spices and you've got yourself the perfect Easter  morning brekkie.


Carrot Cake Pancakes.


Carrot Cake Pancakes; Vegan, Gluten-Free. Makes one serving (4 small pancakes). 


Ingredients
  1. 1/4 cup coconut flour
  2. 1/8 cup raisins
  3. to taste: cinnamon, ginger, nutmeg, allspice
  4. small sprinkling of stevia
  5. 3 baby carrots, grated
  6. 1/4 cup plus 1/4 cup water, divided


Method
  1. Heat a nonstick pan over medium heat.
  2. In a medium size bowl, combine coconut flour, spices, stevia, and carrots. Set aside.
  3. Put raisins in a small soup pot and cover with water. Bring to a boil and boil JUST long enough for raisins to plump up. Add them to your bowl with the flour, spices, and carrots. 
  4. Mix everything together, and add 1/4 cup of water. Stir well. Add remaining 1/4 cup of water and stir very well. 
  5. Form a small patty with your hands and place on pan. Cook about 3-4 minutes per side, flip, and repeat to make 4 pancakes.


Note: Coconut flour can be a bit tricky to work with if you don't combine it with a grain-based flour. But if you're patient and willing to really work your hands into it, you can manipulate these to hold together. Either way, they still taste really good. 

Orange-Basil Nice Cream

This right here is heaven. I'm not kidding. I literally melted when I ate this. You already know my utter obsession with banana ice cream, but when I added these two extra ingredients to the mix? Oh wow. I am in love.


Orange-Basil Nice Cream.


Orange-Basil Nice Cream; Vegan, Gluten-Free. Serves One.


Ingredients
  1. one frozen banana, frozen in chunks
  2. one frozen orange, peels and sectioned prior to freezing
  3. 3 leaves of fresh basil


Method
  1. Easy-peasy. Add all ingredients to your Vitamix (reserving one of the basil leaves for decoration) and blend until smooth and creamy. 
  2. Spoon into bowl and garnish with remaining basil leaf. Enjoy!

Double Your Grains!

Do you know this little secret? It's pretty cool...
Who doesn't dream about the endless bowl of oatmeal. Doesn't it sound incredible? And pretty unrealistic. But never say never! With my simple trick, you can DOUBLE your oat bowl (or and grain, for that matter!). Eureka, we've done it!


The endless oatmeal bowl. Droooool. I made mine with Blueberries, coconut, and cinnamon. Yummers.


Double Your Grains!


Method
  1. Read the package of your grain of choice (say, oats, for example). For one serving, the directions call for 1/2 cup of oats and 1 cup water. We're not doing that. We will still use 1/2 cup of oats, but we will instead use 2 CUPS of water. It's THAT SIMPLE! Double the food, with the same nutritional info. Dream come true. 
  2. In a small soup pot, bring 1 cup of water to a rolling boil. When boiling, reduce heat to medium and stir in oats. Cook for about 4-5 minutes, until oats are beginning to expand and absorb the water. 
  3. Add your second cup of water and increase heat. Simmer on HIGH until thick, gooey, and utterly drool-worthy. You can ad any mix-ins at this time if you desire. 
  4. Pour into a bowl and enjoy! 


Sunday, April 6, 2014

Cauliflower Quiche

I love making quiche. I feel so "skilled" when I make it. This one is especially fun...mostly because I used purple cauliflower (which makes EVERYTHING better!).
I am always on the lookout for single-serving silicone bakeware, which, by the way, is NOT easy to come by. However. While in Walmart the other day, I was passing through the craft section (go figure...) when I stumbled upon ROWS AND ROWS of single serving silicone bakeware....and it was HALF PRICE. You could say I was a teensy bit excited (I had been searching for this exact thing for about 9 months). Naturally, I stocked up. One little thing--they are in funky shapes. Once I examined the boxes more closely, I realized they were for "mini chefs"...I'm assuming this is the reason they were in the craft section. But who cares! It does the job, and I'm not picky when it comes to shape. In fact, I think it makes things that more special! So, short story made long, my Cauliflower Quiche is heart shaped.


Cauliflower Quiche. Heart shape optional.


Cauliflower Quiche; Vegan, Gluten-Free. Makes one personal quiche.


Ingredients
  1. 1/4 cup ground flaxseeds
  2. 1/4 cup almond  meal
  3. 5 oz. cauliflower chunks, processed into rice
  4. 1/2 cup canned chickpeas, drained and rinsed
  5. 1 cup fresh spinach leaves, finely chopped
  6. garlic and onion powders
  7. dash of cumin
  8. water as needed


Method
  1. Preheat oven to 375 degrees. Set a small silicone bake dish on baking sheet and set aside.
  2. In a medium size bowl, combine flax and almond meal. Add enough water to moisten and stir. Keep adding water a little bit at a time until a "dough" forms. 
  3. Spread dough into dish, pressing it fairly high up on the sides to resemble a crust.
  4. Bake uncovered for 15 minutes. 
  5. Process chickpeas in mini food processor with splashes of water until mostly pureed. Add to bowl along with cauliflower rice, spinach, spices, and stir well. Add enough watt to make it hold together. It should be workable and slightly mushy. 
  6. Let crust cool 5 minutes (it might puff up in the center--that's perfectly fine. Just gently press it back down.) and then spread filling over crust--you will have about 1/2 of filling left over. 
  7. Bake for 20 minutes more. Let cool at least 10 minutes before removing. Enjoy!


"Blondie" Pie

To tell you the truth, I thought this would be disgusting. I was totally branching out when I tried this recipe. I really thought it would be quite gross. But I was VERY pleasantly surprised! It was very VERY tasty. Also, it hardly counts as "pie"...this baby packs 20 grams of protein and over 15 grams of fiber! Totally acceptable to eat this as a full meal...with a side of some veggies, of course.


Blondie Pie.


Blondie Pie; Vegan, Gluten-Free. Makes one "mini" size pie.


Ingredients
  1. 1/4 cup flaxseeds, ground
  2. 2 dates
  3. 1 cup canned navy beans, rinsed and drained
  4. 1 T agave nectar
  5. 1/4 tsp vanilla powder


Method
  1. For the crust: In a mini food processor, combine flax and dates. Process until crumbly and sticky. 
  2. Remove and press into small dish (if it doesn't hold together, add a splash of water and stir). 
  3. Cover and place in fridge while you make your filling. 
  4. In mini food processor, combine beans, agave, and vanilla powder. Blend until very smooth. 
  5. Remove crust from fridge and spread filling evenly over the crust. Recover and place back in fridge. Refrigerate 8+ hours. 
  6. Slice and enjoy!


Last bite. Sharing Optional.

Friday, April 4, 2014

BBQ Quinoa Crust Pizza

I've tried a LOT of different pizza crust recipes, and so far, this one is probably one of my favorites (either this one or my pinto pizza crust recipe)! Surprisingly easy, super delicious, and packed with protein. Did you know the quinoa grain is a complete protein all by itself?! This pizza just got even more awesome. And this crust combined with this BBQ sauce...oh. I think I've gone to vegan food Heaven...


BBQ Quinoa Crust Pizza.


BBQ Quinoa Crust Pizza; Vegan, Gluten-Free. Makes one Pizza.


Ingredients


For the Crust
  1. 1/2 cup quinoa, soaked 8+ hours
  2. 1/2 tsp apple cider vinegar
  3. onion and garlic powders, to taste


Method
  1. To soak your quinoa, simply add it to a medium size bowl and cover with water. Cover and let sit for at least 8 hours. 
  2. Preheat oven to 400 degrees and line a baking sheet with parchment. 
  3. Drain water off of quinoa and add it to a mini food processor, along with vinegar and spices. Process until a dough forms. 
  4. Scoop out dough and spread evenly onto parchment. Bake uncovered for 15 minutes.
  5. While crust is baking, prepare your BBQ sauce (recipe below) and toppings of choice (I used sliced mushrooms and fresh spinach leaves). 
  6. Remove crust from oven, let cool 5-10 minutes, then spread about 3 T of BBQ sauce over crust. Add toppings and bake 10 more minutes. Remove, let cool 5-10 minutes, and serve!


For the BBQ sauce
  1. 1 T apple cider vinegar 
  2. 1 T agave nectar
  3. about 2 tsp lemon juice
  4. 1/4 tsp chipotle powder
  5. 1 1/2 T no salt added tomato paste ( I use Muir Glen Brand)
  6. 1 T Bragg's liquid aminos
  7. 1/2 T arrowroot powder
  8. 1/2 tsp black pepper
  9. dashes of paprika, cumin, and onion powder
  10. 1/2 tsp spicy brown mustard

Method
  1. Combine all ingredients in a small soup pot over low-medium heat and cook, stirring regularly, until thickened and warmed. 


Spicy BBQ sauce. 

Vanilla Bean Pancakes with Raspberry-Chia Jam

Pancakes. Just saying this word makes me happy. I mean, who in the world doesn't love pancakes?! I have yet to  meet this person (if they even exist!). These pancakes are a bit different, though. You should know by now I LOVE to play around with different things...manipulating ingredients to act like others. It's so much fun! These pancakes have a VERY secret ingredient. Even though the "secret ingredient" is mentioned in the title! Sneaky, huh? Don't be grossed out by this special ingredient. It TOTALLY makes these pancakes. They are absolutely, positively, WONDERFUL. I would eat these every day for the rest of  my life if I could! And even better? They're quick, easy, and extremely nice to look at. Go ahead--"indulge" (even though these are 100% guiltless!).

Vanilla Bean Pancakes with Raspberry-Chia Jam.


Vanilla Bean Pancakes with Raspberry-Chia Jam; Vegan. Makes one serving (4 pancakes and about 1/3 cup Jam).


Ingredients

For the Pancakes
  1. 3/4 cup canned navy beans, drained and rinsed
  2. 3/4 tsp baking powder
  3. 1/2 packet (1/2 tsp., approximately) stevia
  4. 1/4 tsp vanilla powder
  5. 2 T oat flour
  6. 1 T vital wheat gluten
  7. 1/4 cup almond milk

Method
  1. Heat a non stick pan over medium heat. 
  2. In a mini food processor, combine beans, baking powder, stevia, and vanilla powder. Process until thick and smooth. 
  3. Transfer mixture to a bowl. Add flour, gluten, and milk and stir well. 
  4. Spoon approximately 1/4 cup of batter onto heated pan and spread around (gently!) with the back of a spoon. Cook about 3-3 1/2 minutes and then flip. Repeat to make 4 pancakes. Top and enjoy!
Note: Unlike normal flour-based pancakes, these don't "bubble" when ready to flip. Instead, watch them carefully around the edges. When the edges look like they are beginning to cook, it's time to flip.


Vanilla Bean Pancakes, pre-toppage.


For the Raspberry-Chia Jam
  1. 1/3 cup frozen raspberries
  2. 1 T plus 2 tsp chia seeds
  3. 1 T agave nectar

Method
  1. Super simple. Put all ingredients in your Vitamix and blend until raspberries are smooth and ingredients are fully combined. 
  2. Pour into a small dish, stir, and cover. Place in fridge for about 15 minutes to thicken up. 
  3. Use as desired (in this case on top of the pancakes) and enjoy! 


Raspberry-Chia Jam. 

Wednesday, April 2, 2014

Holiday Post!: Easter Salad

I'm all about spring-themes food. It's just so pretty! And what vegan doesn't love a big, raw SALAD?! MMMM.....
I've had a head of purple cauliflower in the fridge for a while...I've been waiting to use it until it got close enough to Easter so I could be festive. You all should know by now...I'm cheesy like that! This is a quick, delicious, and beautiful meal you can serve/eat on Easter, and any time of year for that matter! It takes all of 10 minutes to prepare, but it's both pleasing to the eye and the tastebuds. Sounds like a win-win to me!

Easter Salad.


Easter Salad; Vegan, Gluten-Free. Serves One.

Ingredients
  1. 1/2 a medium head purple cauliflower
  2. 5 cherry tomatoes, halved
  3. 1/2 cup green peas, steamed if desired
  4. 3 oz. carrot "matchsticks" 
  5. onion and garlic powders, black pepper to taste
  6. 1-2 T apple cider vinegar (varies depending on how tangy you want it)

Method
  1. Place your cauliflower chunks into a mini food processor and process until  the texture of rice. DO NOT OVERPROCESS!
  2. Add cauli rice to a large bowl. Top with green peas, carrots, and tomatoes. Sprinkle with spices and drizzle with apple cider vinegar. 
  3. Serve!


Easter Salad, all mixed up and ready to eat!